There are a number of potential reasons for changing your website’s URL. Maybe when you first set up your website the URL you really wanted was not available but now is. Perhaps you’ve rebranded and now have a new company name. Maybe you’ve decided to get away from .net and move to .com. There are a bunch of reasons why you may want to change your URL. This post is going to teach you how to change your website URL without killing your search optimization.
Pre-Work: Before Changing Your Website URL
There are some things you’ll want to do before you actually make your URL change. This will be helpful throughout the process and will save you stress from having to scramble in the middle of your address change (or delaying it entirely).
Step 1: Acquire Your New Domain
This is a no-brainer, but worth mentioning anyway. The first thing you need to do is get your new domain and ensure you have access to edit your nameservers and/or DNS zones so you can direct traffic to your new site, when ready.
Step 2: Set Up Google Search Console For Your OLD Domain
If you don’t already have Search Console set up on your current/old website, now is the time to get it done. It’s easy to set up Search Console and is something that you’ll use to inform Google of your change of address later on in this process.
Step 2.5: Set Up Google Search Console For Your NEW Domain
While you’re at it, go ahead and set up Search Console for your new domain. You’ll follow the same steps on this site as the one you just did, so it’ll be quick.
Step 3: Audit Your Old Website’s Search Optimization
Run an audit of your current website’s SEO and metadata, like title tags, descriptions, and search rankings. You can do this with a tool like Seoptimizer or Screaming Frog SEO Spider. What you’re doing here is getting a more clear understanding of what search engines see when they crawl your site as well as getting a baseline for your search rankings for important keywords and searches.
The last thing you’ll want to do is create new site and kill your SEO! This will help ensure you don’t.
Step 4: Create a List of Your Old URLS
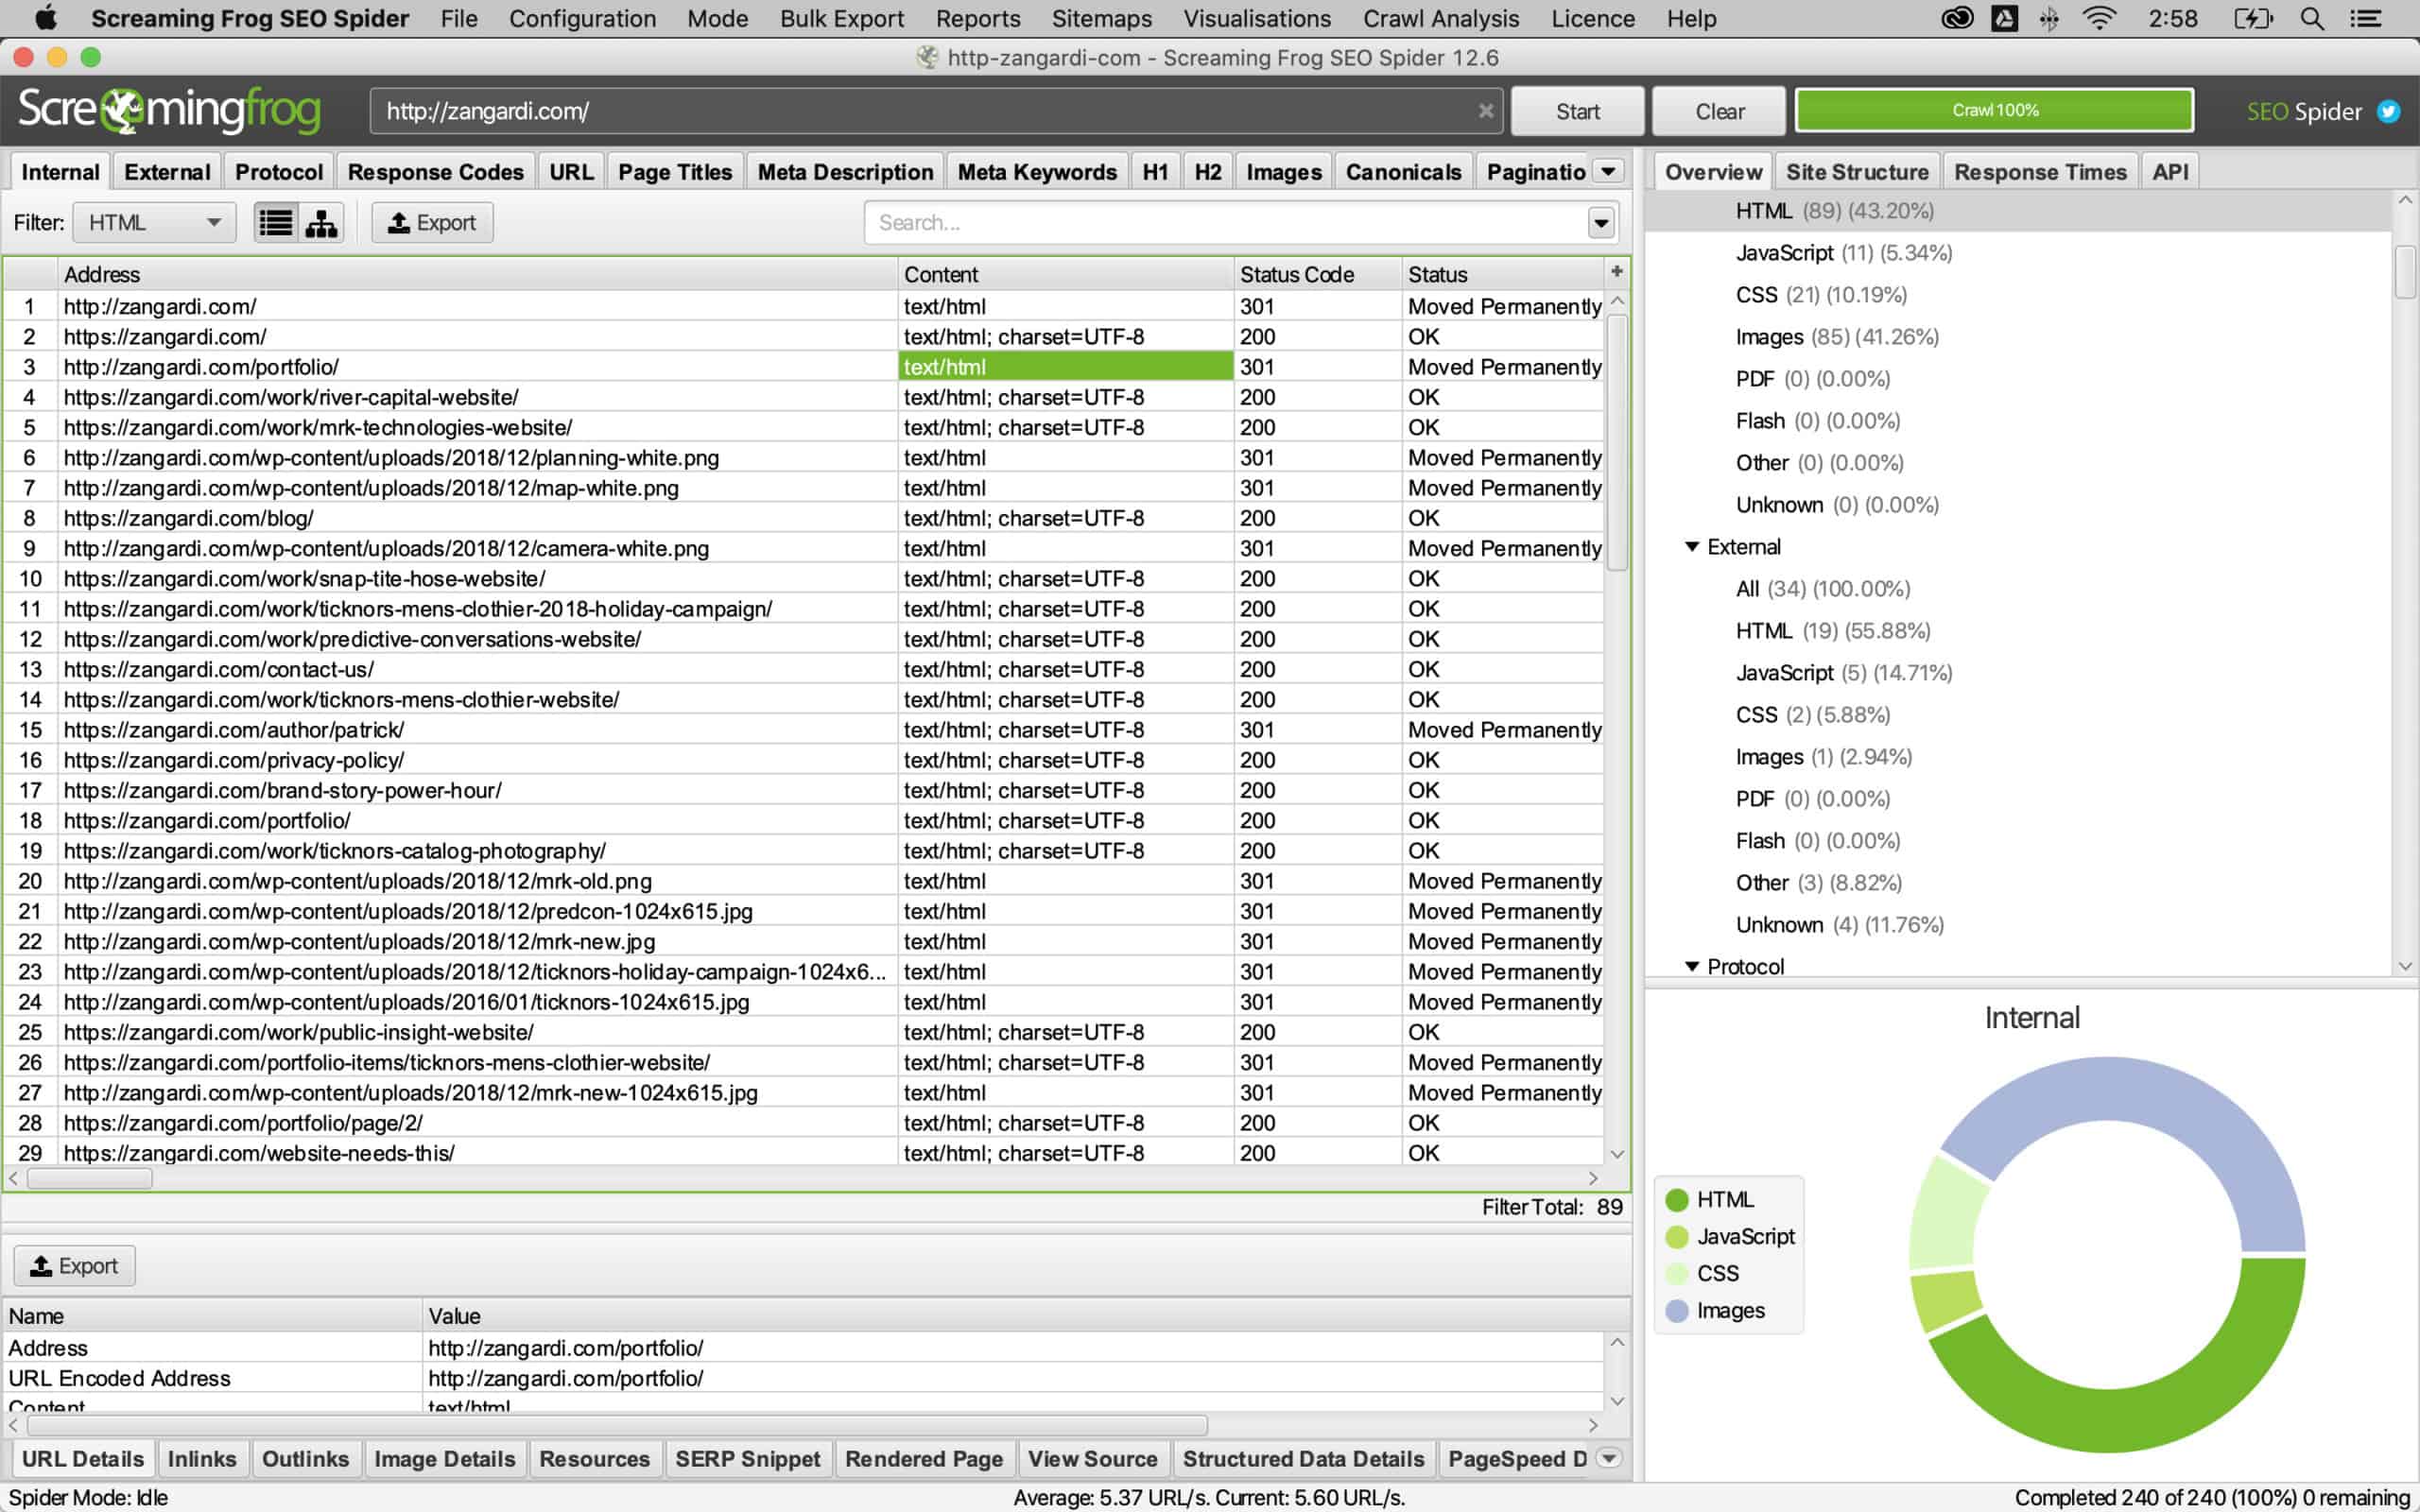
I like to use Screaming Frog SEO Spider for this. When you run the program all you need to do is enter your (current) website URL and the tool will crawl the site and show you your internal links, title tags, descriptions, and a wealth of other information about your site. You’ll use this to create your redirect links, telling search engines and browsers that your domain/URL has changed and where to find the new page and content.
OK, so your pre-work is done. Now, what do you need to do to change your URL and not lose SEO?
Create Your 301-Redirect Sheet
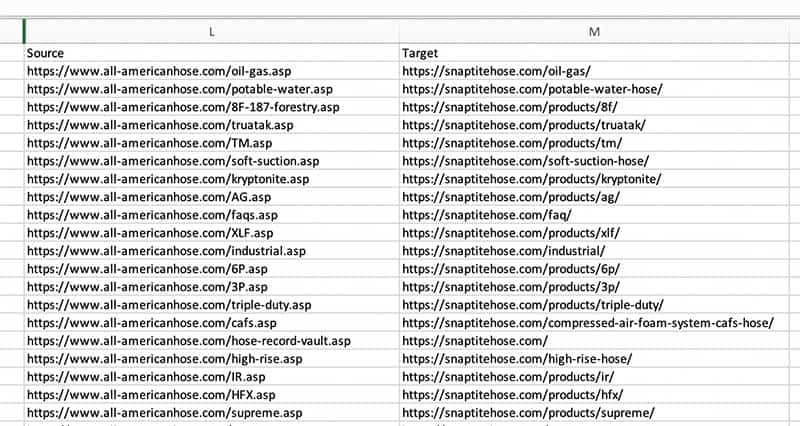
When you change your domain, your URLs are going to change. Use that list of “old” URLs from pre-work step 4 to create a mapping of your old URLs and their target new URLs. We like to use a simple Excel file with two columns: column A holds all the old URLs and column B holds the new URLs.
Helpful Tips:
- If your old website is built on WordPress, there is a great, free, plugin that you can use to redirect your traffic. Check out Redirection.
- If your site is on a Windows server with IIS, you can do this right inside IIS. Microsoft has a well documented how-to right here.
- If your site is on a Windows server without IIS, you’ll have to write some code in the web.config file. The markup is pretty simple to follow:
[fusion_syntax_highlighter theme=”” language=”html” line_numbers=”” line_wrapping=”” copy_to_clipboard=”” copy_to_clipboard_text=”” hide_on_mobile=”small-visibility,medium-visibility,large-visibility” class=”” id=”” font_size=”” border_size=”” border_color=”” border_style=”” background_color=”” line_number_background_color=”” line_number_text_color=”” margin_top=”” margin_right=”” margin_bottom=”” margin_left=””]PGNvbmZpZ3VyYXRpb24+Cgk8bG9jYXRpb24gcGF0aD0ib2xkLXBhZ2UtMS5odG1sIj4KCQk8c3lzdGVtLndlYlNlcnZlcj4KCQkJPGh0dHBSZWRpcmVjdCBlbmFibGVkPSJ0cnVlIiBkZXN0aW5hdGlvbj0iaHR0cDovL3d3dy5uZXdzaXRlLmNvbS9uZXctcGFnZS0xLyIgaHR0cFJlc3BvbnNlU3RhdHVzPSJQZXJtYW5lbnQiIC8+CgkJPC9zeXN0ZW0ud2ViU2VydmVyPgoJPC9sb2NhdGlvbj4KCgk8bG9jYXRpb24gcGF0aD0ib2xkLXBhZ2UtMi5odG1sIgoJCTxzeXN0ZW0ud2ViU2VydmVyPgoJCQk8aHR0cFJlZGlyZWN0IGVuYWJsZWQ9InRydWUiIGRlc3RpbmF0aW9uPSJodHRwOi8vd3d3Lm5ld3NpdGUuY29tL25ldy1wYWdlLTIvIiBodHRwUmVzcG9uc2VTdGF0dXM9IlBlcm1hbmVudCIgLz4KCQk8L3N5c3RlbS53ZWJTZXJ2ZXIKCTwvbG9jYXRpb24+CjwvY29uZmlndXJhdGlvbj4=[/fusion_syntax_highlighter]
- Redirects must be done on your old website/server
- You should keep your old site/server active for at least 3-4 months after making the switch.
Set up Google Analytics
We recommend setting up a new property within your Google Analytics account. This is just our preference because it allows us to keep historical data from your old website separate. It’s cleaner.
At any rate, we recommend setting up your analytics account and getting your new analytics tracking code installed prior to go-live. Don’t want to forget!
Launch Your Site
If you haven’t already done this, launch your new website by attaching your new domain name to your new site.
Ensure Your New Site Has an XML Sitemap
A Sitemap is an XML file that lists the URLs for a site. It is something that search engines can see to find a list of all web pages within a web site and how to access them. It is very important for new websites to include, especially if that new website does not have a lot of external links pointing to it (also called backlinks or inbound links).
Learn more about XML sitemaps from Yoast.
If you’re using WordPress for your new website, we recommend installing Yoast SEO. In addition to automatically creating your XML sitemap for you, it’s also hands-down the simplest SEO tool for WordPress, allowing you to edit your title tags, descriptions, and set up site-wide SEO defaults (more on that below). If you don’t like Yoast or prefer something different for your WordPress website, check out Google XML Sitemaps, another great free tool.
Set up Your SEO Continuity
Use your audit of your old site (assuming that it’s a well-performing website) and move over relevant titles, description and other site meta data to your new site.
If you don’t have good SEO on your old site, take the time now to go through each page and write seo-optimized title tags and other information for search engines to see. You can use Yoast SEO to set up the page metadata and see previews of how your page will be represented on search engine results pages.

Submit Your New Sitemap to Google Search Console
Inside of your Search Console account (the one you set up earlier in pre-work step 2.5), go to the URL Inspection tool. In here, submit your new sitemap and request indexing. If you’re using Yoast SEO, the address will be https://yourdomain.com/sitemap_index.xml
Submit Change of Address on Your OLD Domain
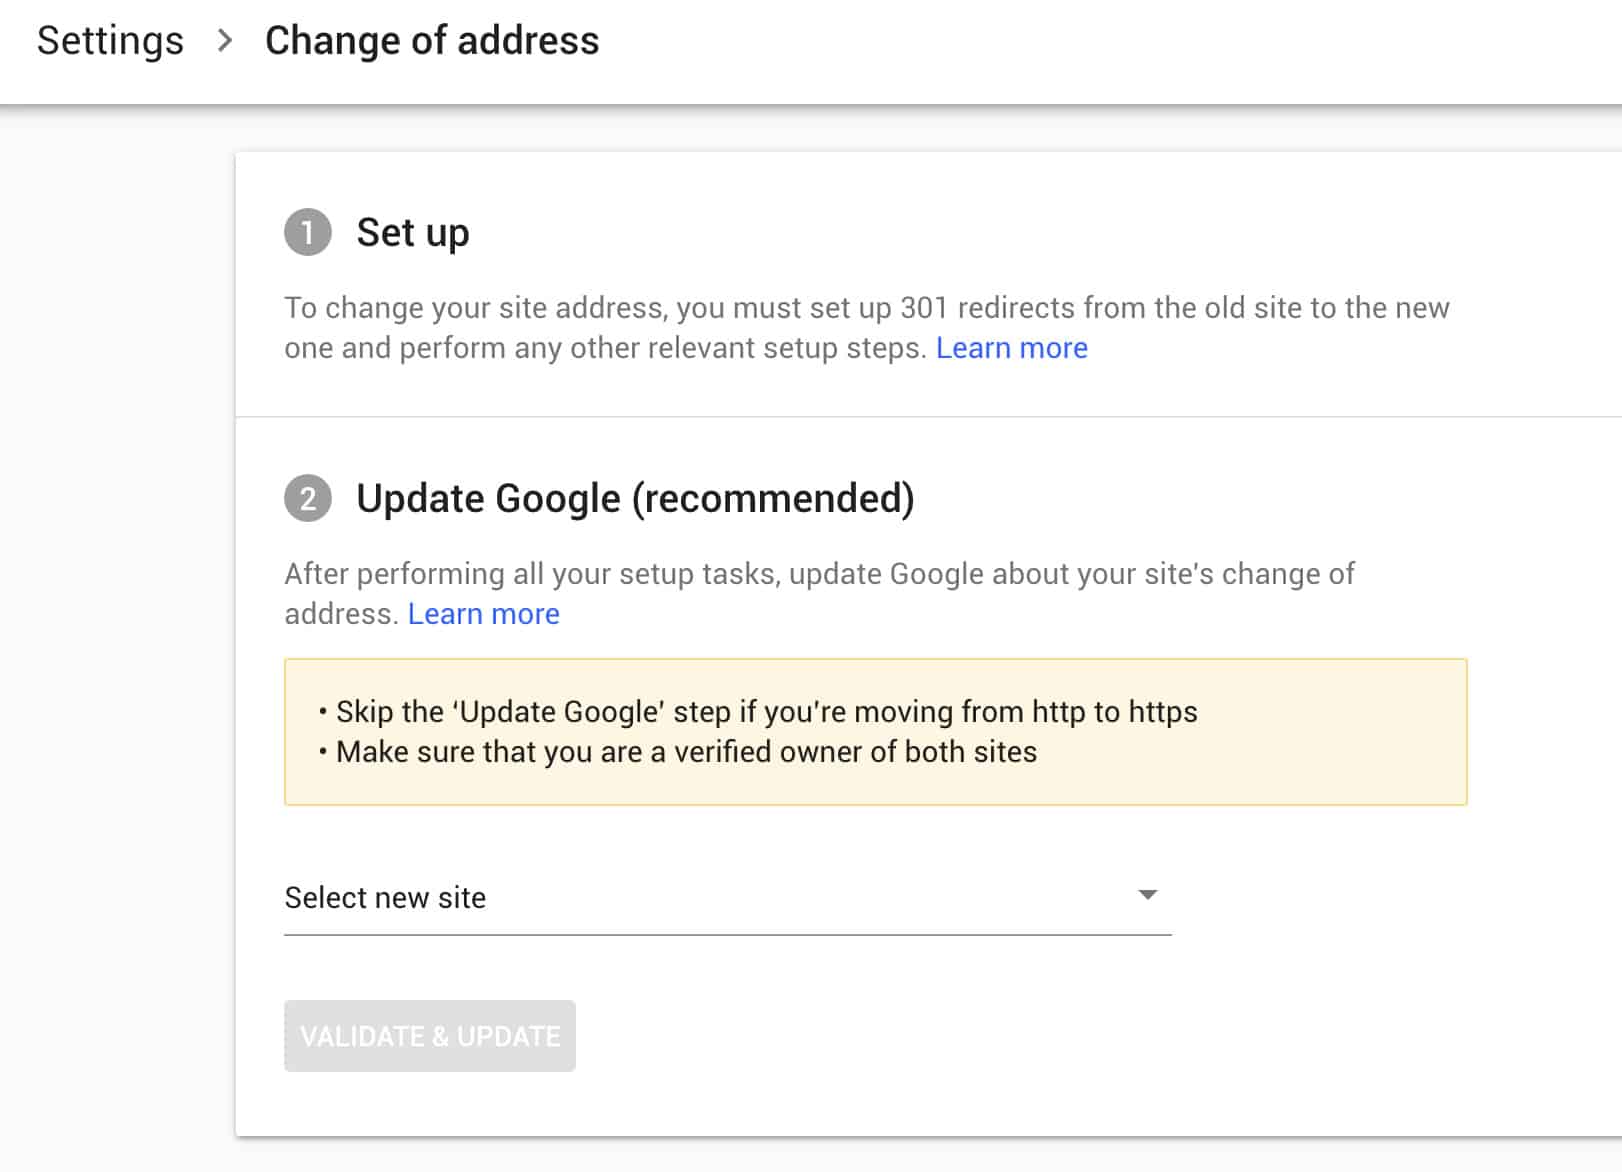
In Search Console, go to the profile for your old site. Along the left hand side you’ll see a menu drawer. Go to settings > Change of Address. Use the drop down menu to select what address you want to change it to. Hint: This should be your new address.
Monitor Your Traffic
Now that your site is live and you’ve notified Google of your new domain, now is the time to begin monitoring your traffic, search engine rankings, and any errors or messages inside of Google Search Console. This tool will tell you of errors that need to be corrected to ensure your site is well optimized and ready for ranking.
Create a List & Reach Out to Sites Linking To Your Old Domain
It’s best practice to reach out to websites that are linking to your old site and request that they update your links to point to your new domain. A simple way to search for backlinks is to simply type if your old domain URL in Google and see who is directing traffic to your site.
Ahrefs has a great backlink checker which will give you a list of websites that are linking to your site. The free version of the tool is good, but I recommend paying for a trial to get your full report. From here, put together a call/email log and get to work on requesting these links to be updated! It will help your SEO in the long term because Google prefers sending traffic directly to your site, not through a redirect.
So there you have it — How to Change Your Website to a New Domain URL (without killing your SEO)!
We hope this guide will be helpful for you if you ever find yourself in the position where you need to change your website address. And as always, if we can provide assistance, please feel free to contact Zangardi Studio here.